Recently I had a recurrence of an autopilot pitch mode issue. I first noticed this on a Feb 8th Angel Flight earlier this year. In that case, a sudden pitch down deviation got my heart going, but shutting things off and back on again returned to normal operation. You can read about that here, including some diagnostics I’d done on my own at the time.
My involvement down at DAMF has opened up a host of new resources and references. The guys there got me hooked up with an expert down in South Carolina that offered to guide me through the diagnostics to see what is wrong.
This post is basically the flight plan that I will perform over the next few days to drill down into the problem. Use the Tab layout to quickly refer back to the diagrams for the A/P and the Coupler. Use the scripts to run the test and understand each piece.
ALTIMATIC III B – DIAGRAM DISCUSSION Altitude Hold: Roll mode is engaged and we are tracking our GPS course in the horizontal plane. Buttons #1 and #2 are engaged, and the Aspen GPSS steering mode is active. ENGAGING ALTITUDE HOLD: We reach 9000′ and desire to have the autopilot hold that altitude in the vertical plane, while the tracking features follow our course in the horizontal plane. Engage Buttons #8 to activate pitch mode. If you forgot to center the Pitch Command Disk (Knob #5), pull yourself down from the ceiling and do so now. Knob #5 sets your climb and descent rate, and doesn’t care what altitude you are at or heading to. It allows you to manually trim the airplane through the autopilot in the pitch attitude. With zero climb or descent, set the Altitude Selector to the current altitude by twistingKnob #7 until Indicator #6 shows level. When it does, engage the Altitude Select (aka pre-select) Button #4 and you are done. The autopilot will hold that altitude based on the barometric pressure it senses. As you fly along and the pressure changes, subtle changes to Knob #7 will climb or descend the airplane accordingly. Regarding Knob #7 – don’t let the kids touch that! Moving this knob aggressively will cause a very spirited climb or descent, and will wake everyone up in the back. Flying along through up and down drafts, Indicator #6 reflects a need to climb or descend and the altitude fluctuates. The autopilot responds with an appropriate pitch command that moves the indicator back toward zero. Moving Indicator #9 has no effect in this mode, but is a valuable reference is pre-selecting and altitude for automated capture (discussed below). Altitude Pre-select: Say we are flying along at 9000′ and have successfully captured that altitude. Buttons #1, 2, 4, and 8 are all engaged. Indicator #6 is neutral and #9 shows 9000′. You are given a descent to 8000′, and want to use the altitude preselect to perform the descent and capture the altitude automatically. YOU COULD JUST GRAB THE ALTITUDE SELECTOR – Knob #7 – and set it to 8000′. This is actually the recommended approach, and I’ve tried it. While fighting the G-forces pulling me out of the seat, I have to remember to get those throttles pulled back before the airspeed zips through the yellow arc. The wings start bending imperceptibly downward at this point, and the horizontal stabilizer upward with the negative-G push. Congratulations Captain – all your passengers are crying and the dog is pinned to the roof. Just kidding, of course, but not too far from the truth. My autopilot is aggressive enough in pitch that doing routinely is a bad idea. The airplane is clean and accelerates well into the yellow arc with only 4 degrees of down pitch. Power needs to come back to 21″ MP or less to even make that work. Speed brakes would make sense on this airplane. One thing I haven’t been doing is adjusting the aggressiveness with the Pitch Command Disk – Knob #5. All-in-All I am not happy with the smoothness of the ride doing this, so I generally only use Altitude Hold, and sometimes adjust an automated climb rate without automated capture. I will try this again by pre-adjusting the Pitch Command Disk to try and smooth out the ride. NAV/APPROACH COUPLER These notes were taken during the initial 2/8/16 Angel flight where the pitch issue first reared it’s ugly head. They are included here for my own later reference, and of course, for any value they may bring to you. Setting up altitude hold mode after reaching the desired altitude, the nose pitches down aggressively. I disengage everything except Button #1 – Roll Control, and make sure the Roll Command Knob is centered – Knob #3. Button #1 is ON and #2,4, and 8 are OFF. This is a wing leveler mode where Knob #3 will bank the aircraft left and right. Resistance should be present in the yoke roll movement, but no resistance in pitch. Continuing to active the autopilot functions to identify the problem circuit, I re-engaged Button #2 for the heading mode. Now the airplane will follow the heading bug on the Aspen. Selecting GPSS on the Aspen changes the heading mode into GPSS tracking, and the airplane begins to track the GPS course from the Garmin 530 WAAS. At this point – Roll mode buttons #1 and #2 are in (On/Engaged). Pitch mode buttons #4 and #8 are off (Out/Disengaged). The autopilot is flying the airplane on course, but altitude is done manually with yoke and trim. Once again attempting to capture and hold altitude while in level flight, I engage Pitch Control – Button #8. If the Pitch Command Disk – Knob #5 – isn’t centered, the airplane will climb or descend accordingly. Center the disk and use the Altitude Selector Knob #7 to set the Trim Indicator #6 to level flight. Move the Calibrated Altitude Indicator #9 to the current altitude. You are in level flight and at the assigned altitude. Engage the Altitude Select/Pre-select Button #4. The airplane should hold the current altitude and the Trim Indicator #6 should remain level or continuously return to level in up an down drafts. During this last step, engaging Button #4 causes the Trim Indicator #6 to show a strong down deflection and the autopilot to respond with an aggressive push-down. Hmmm.. Definitely broken. I turn everything OFF on the autopilot. The Roll Control Button #1 is also the master switch, so I ensure it is all OFF. I want to try this again to see if a reset helped. So far the issue is associated with Button #4 and indicated by Trim Indicator #6. With everything turned off and then restarted as above – I flew home for the next 90+ minutes with no issues what so ever. During the last leg home, I flew a GPS approach with vertical navigation, and the glideslope coupler worked flawlessly. I will continue to watch this, but it brings emphasis to the point that hand flying skills must remain sharp. Imagine a strong push down while flying an approach to minimums in trying weather. Always be ready to take over. Fly Safe. Test Plan for Normal Operations: Utilize the autopilot as in normal operations, in an attempt to replicate and video the issues. Test Plan for Determining the source of the Pitch Oscillations: The pitch issue could be caused by a trim sensor, servo, or altitude hold module. This test script will determine which it is. Test Plan for Determining the source of the Roll Oscillations: First of all, an expert I’ve been referred to recommends only using localizer mode for roll control. This is counter to what I’ve been told after avionics upgrade, but makes sense and is worth a try. We will be leaving pitch control deactivated in all modes for this test, and trim by hand.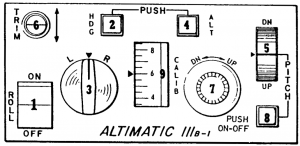 – Button #1 is the AutoPilot Master Switch as well as Roll Control push-on/push-off switch.
– Button #2 is the HDG push-on/push-off switch.
– Button #3 is the Roll Command Knob that is in play when in wing leveler mode (Button #2 OFF, Button #1 ON).
– Button #4 is the Altitude Hold push-on/push-off switch. It is also an altitude pre-select.
– Wheel #5 is the Pitch Command Disk, which sets your VSI climb or descent rate
– Indicator #6 shows in up/down command indication when Button #8 and #4 are engaged. The indication is based on the altitude selected by Control Knob #7. Indicator wheel #9 is only a reference.
– Knob #7 is the Altitude Selector Knob, which sets the desired altitude and relies on the pitot/static system and pressure. If you are at the altitude you want, use this knob to adjust Indicator #6 to zero (level); engage Button #4; and set Indicator #9 as a reference.
– Button #8 is the Pitch Control push-on/push-off switch.
– Wheel #9 shows the calibrated altitude you are holding. Reference only – you can spin this all day to no effect.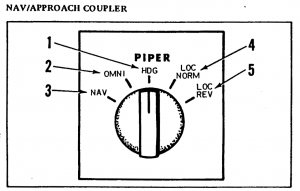
note that Jerry recommends using LOC mode all the time to resolve the roll mode issue I’ve noticed
This engages the roll mode by default and automatically activates button #3 to act as a wind leveler.
This is the normal setting and nothing happens yet. If heading button #2 is engaged at this point, the autopilot will follow the either the heading bug or the GPS Course loaded in the Garmin 530, according the Aspen GPSS setting (heading or GPSS).
Aircraft turns to follow the course loaded in the Garmin.
Roll Command Knob is deactivated when the heading mode is on. Aircraft rolls to follow either heading bug or course guidance, depending on ASPEN GPSS setting. Note that no pitch mode is yet active. Pitch is managed manually.
Pitch mode is engaged at this point and the pitch wheel is automatically activated (wheel #5). Aircraft will pitch according to Pitch Command Disk.
This engages the roll mode by default and automatically activates button #3 to act as a wind leveler.
This is the normal setting and nothing happens yet. If heading button #2 is engaged at this point, the autopilot will follow the either the heading bug or the GPS Course loaded in the Garmin 530, according the Aspen GPSS setting (heading or GPSS).
Aircraft turns to follow the course loaded in the Garmin.
Roll Command Knob is deactivated when the heading mode is on. Aircraft rolls to follow either heading bug or course guidance, depending on ASPEN GPSS setting. Note that no pitch mode is yet active. Pitch is managed manually.
Pitch control is driving ONLY the pitch servo at this point, and the pitch trim is not involved. Remember that pitch trim is used to relieve the load on the pitch servo (think like an STEC 30).If the problem recurs at this point – SERVO HAS FAILED
if not…. CONTINUE
If the problem recurs at this point – PITCH TRIM SENSOR HAS FAILED
if not…. CONTINUE
If the problem recurs at this point – ALTITUDE HOLD MODULE HAS FAILED
if not…. KEEP FLYING UNTIL YOU CAN REPLICATE THE PROBLEM
This engages the roll mode by default and automatically activates button #3 to act as a wind leveler. We are going to leave pitch control off in this test.Look for roll oscillation in this condition. Only wing leveler mode is active.If the problem recurs at this point – ROLL SERVO HAS FAILED,
and takes 1/2 day to get to it.
if not…. CONTINUE
This is the normal setting and nothing happens yet. If heading button #2 is engaged at this point, the autopilot will follow the either the heading bug or the GPS Course loaded in the Garmin 530, according the Aspen GPSS setting (heading or GPSS).
Note whether or not the wing rock is present. Try different headings.
Roll Command Knob is deactivated when the heading mode is on. Aircraft rolls to follow either heading bug or course guidance, depending on ASPEN GPSS setting. If the problem recurs at this point, it may be that the ROLL MODULE HAS FAILED [not real clear on the component failure here]
Note whether or not the wing rock is present in this condition.