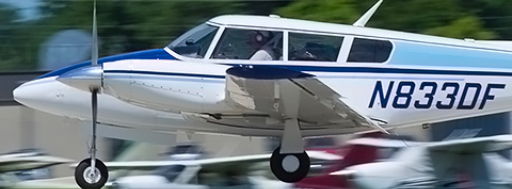
I’ve always been happy with the work Sussex Aero has done for me, but this year I thought I’d like the experience of doing it myself, with supervision. I asked Matt Sager to work with me on my first owner-assisted annual for N833DF. He agreed, and began to train and encourage me in my apprenticeship. He is a patient teacher and consummate professional.
Panchito’s owner, Larry Kelley, is another A&P that graciously offered up his own museum hangar for my annual. He didn’t balk when the work became rather extensive and drawn out either, going so far as to displace his own airplane out on the ramp. Larry allows me the use of his equipment and resources, takes the time to train and encourage me, and even stops to help whenever I need him.
Matt and I began this years annual in mid-October, with me taking all the inspection panels off of the airplane and putting all the hardware in bags. One of the most difficult parts of working on airplanes is being sure the right hardware (screws mostly) goes back in the right place. I found in the past that, with enough force, they can be made interchangeable.
This years squawk list wasn’t too extensive going into this annual. The largest and most difficult issue to address would be repairing two flattened control cable pulleys in the pitch trim system. They’d been accidentally glued in in place when the new interior went in, and the pitch trim cable movement was sawing right through them instead of riding on top of them.
Immobile pulleys made it seem like the autopilot pitch trim in the airplane was malfunctioning, which led us to overhaul the pitch trim servo. Now I am fairly sure that was unnecessary. The issue all along was these frozen pulleys. The entire interior had to be removed before they could be replaced, and the cable itself would also be replaced. It is interesting to note that Matt found the pitch trim cable to be routed incorrectly since manufacture, causing more friction in the system than necessary, and additional wear on the cable itself.
As the inspection progressed, I began acquiring those tools I had to borrow from Matt, or couldn’t find in my Craftsman collection. Some of those would be the premium snap-on variety, like screw drivers and dikes. The Craftsman screw drivers weren’t cutting it at all, and rounded off when I needed them most. The large wrenches I needed, as well as a very nice torque wrench were less well known brands. I didn’t need to pay the premium, I thought, for torquing oil filters and spark plugs a few times a year.
All the panels were open, so I removed the oil filter from each engine and cut them open for inspection. Matt went over all that with me, and it took me allot more time than it takes to read these sentences. Time at the hangar was a very nice change of pace, and I often thought how fortunate I was to be out of an office environment with very few cares in the world. When the new oil filters went back in, and I spent a few more hours getting them safety wired properly. Safety wiring is an art form, at least, and I wired in each of the filters three times apiece before even calling Matt over to inspect my work. They passed inspection, with a few comments for getting better next time, before I could move on.
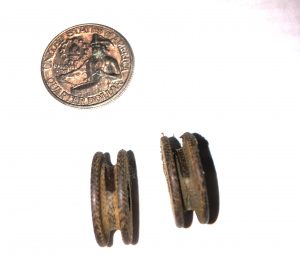
I removed all of the Spark Plugs and was taught how to clean and inspect them. It required several hours to do all this work at my pace. The majority of my first work on the first go didn’t pass Matt’s inspection. Each four cylinder engine has eight plugs, so that is sixteen plugs total that needed to be removed, cleaned, inspected, re-gapped, and re-installed. I did all this work, including re-gapping, and used a pass/fail gauge to ensure that the new center electrode hadn’t worn beyond spec. Five of the plugs didn’t pass this final step, so I immediately wondered why this was the final step? I opted to replace all of the plugs since now I knew what worn plugs looked like. Even though I enjoyed my time at the hangar, I could eventually be more efficient.
Matt’s Inspection of the aircraft began next as he shined a bright light into each of the inspection panels I had opened or removed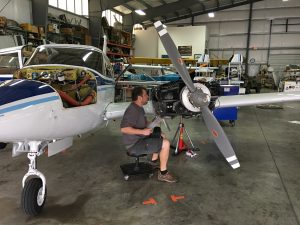 . Him completing his step would allow me to come behind him and re-install all of those panels. One step closer to being done and airborne again! Easy peasy.
Under the right wing – outboard – Matt found evidence of a birds nest! I was not happy! My feathers were ruffled to think this beautiful machine had been neglected and allowed to be insulted in such a way! It reflected poorly on me, I thought. All those thoughts were in my head of course, and Matt kept trucking along. I’d come behind him and vacuum out the detritus that was caused by a few weeks on the ramp (damaged hangar had me slumming). I appreciated Larry all the more for sharing his hangar the way he has, and knew I’d be digging those sticks out of there this afternoon.
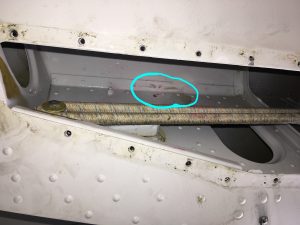 Working his way inward toward the wing root, Matt peered into the access panel behind the landing gear box. That access panel exposed the bungee cords that assisted in keeping the gear locked. On the back wall of the gear box, Matt found the outer skin had a crack in it. He stripped off my brand new IMRON paint, and used penetrant dye to be sure. In the picture you see one of the bolts for the main gear trunion has been removed, and the red line indicating a crack from a nearby rivet over and above the bolt hole (not through).
Inspection of the same are on the other wing revealed the very same condition but radiating from a different rivet. We are going to have to remove both main gears to inspect the skin behind this one, and then effect a repair. This annual was already extensive without this issue. We’d press on with the inspection and defer this work until that is all complete. I’d have to personally deal with the financial and timing uncertainty for completion of this repair on my own for the duration.
I have reached out to the experts in PA30s out there, particularly the International Comanche Society members. Lots of opinions and helpful suggestions, and many are just as interested in how we end up fixing this. I’ll certainly keep you all posted.
The inspection continued around the airplane. I mentioned that that the right prop had just a little fore/aft play in it, and I’d been aware of that for some time. The left prop 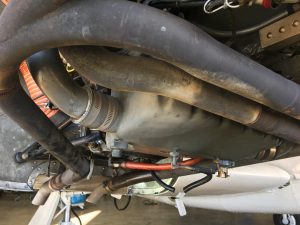 had zero play, so I thought it worth mentioning the difference. Matt flagged it, and the prop was removed for overhaul or
  repair. Maybe I should stop talking and just sit on my hands. Oh bother – I reminded Matt that he had seen some evidence of an exhaust leak somewhere on the right side during the last oil change. He went all over the exhaust with all the panels off, and found the leak at a previously repaired joint. The expansion type joint wasn’t sealing, so more parts came off and went out for overhaul.
These were clear delays, and significant work, so what the hell. In for a penny, in for a pound. I removed the KX-155 and decided I might as well use the time to have the manufactures updated display installed. Mine had been intermittently failing time and again, and I needed reliable radios for what I was doing. Overhauls of exhaust, prop, and radio eventually totalled only 5k$, and could have been much worse. Keep moving.
Getting beyond all this drama would be a good thing, so I was taught how to grease fittings, install baffle material and rivets, use my new torque wrench, and even learned how to build new oil lines for myself. Matt had determined that my oil, fuel, and brake lines were approaching 30 years old at least, and it was time for replacement.
I spend the next week making my own progress. Removing baffles was fairly easy, if I took my time and didn’t break anything else. New baffle material came in from Aircraft Spruce, along with a wide variety of replacement and consumable hardware I wanted for my own stock. I was building a box of parts I typically needed, so that I could stop borrowing for Larry and Matt, and at the same time replace any stock I was using. I learned how to drill and rivet the new baffle material in, and enjoyed the work.
There is quite a bit to talk about with this annual. I’ll package some additional posts shortly to share the details.
When this airplane comes back on line, it will be solid and very squared away.
Fly Safe
Frank