** I had developed a test plan for testing the autopilot and had written a post entitled ‘May 17, 2016 – Altimatic IIIB Testing Plan’. Little did I know it would be another year and a half before I’d get to try it. Let’s start there and refresh what I’m going to do when I get there.
I had a recurrence of an autopilot pitch mode issue that first showed up in February of 2016. I now know that the installation of my interior by Airtex had caused the problem. Glue had gotten onto two of the pitch trim rollers and seized them. Eventually the cables sawed through the pulleys and started to bind. The pitch trim motor would pull but not move, until all of the sudden the friction would be overcome and the nose would dive down or up.
I’ll use the steps here to first remember how to use the autopilot, and then to test all aspects of it. Here we go.
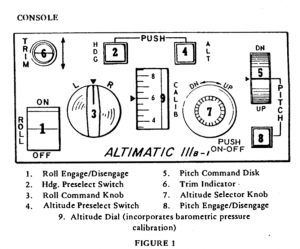 – Button #1 is the AutoPilot Master Switch as well as Roll Control push-on/push-off switch.
– Button #2 is the HDG push-on/push-off switch.
– Control #3 is the Roll Command Knob that is in play when in wing leveler mode (Button #2 OFF, Button #1 ON).
– Button #4 is the Altitude Hold push-on/push-off switch. It is also an altitude pre-select.
– Control #5 is the Pitch Command Disk, which sets your VSI climb or descent rate
– Indicator #6 shows in up/down command indication when Button #8 and #4 are engaged. The indication is based on the altitude selected by Control Knob #7. Indicator wheel #9 is only a reference.
– Control #7 is the Altitude Selector Knob, which sets the desired altitude and relies on the pitot/static system pressure. If you are at the altitude you want, use this knob to adjust Indicator #6 to zero (level); engage Button #4; and set Indicator #9 as a reference.
– Button #8 is the Pitch Control push-on/push-off switch.
– Indicator #9 shows the calibrated altitude you are holding. Reference only – you can spin this all day to no effect.
NAV/APPROACH COUPLER
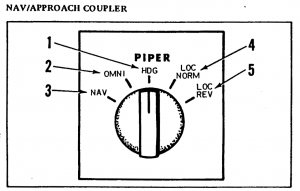
- NAV and OMNI modes are not used
- HDG Heading mode is required for GPSS
note that Jerry recommends using LOC mode all the time to resolve the roll mode issue I’ve noticed - LOC/NORM mode is used when in approach mode and intending to use the glideslope coupler
- LOC/REV mode is intended to be used on a localizer backcourse. Obsoleted by the use of GPS overlay and the lack of practice otherwise.
AutoPilot Pre-Flight: Gyros must be erect before the test begins.
Roll Check:
- Ensure all A/P Buttons OFF
- Button #1 – Push ON Roll Switch
- Move Roll Control left to verify yoke movement
- Overpower movement to check clutch
- Move Roll Control right to verify yoke movement
- Overpower movement to check clutch
- Position Control #3 to off-center left and right. Allow the yoke to move to the stops
Heading Preselect:
- Ensure only A/P Button #1 engaged
- Center Aspen Heading Bug
- Aspen HDG mode (not in GPSS)
- NAV/Approach Coupler to HDG
- Button #2 – Push ON Heading Mode
- Move Heading bug left and right on Aspen
- Observe yoke movement
- Center heading bug to stop movement
Pitch Command Check & Pitch Trim Check: This check should be done efficiently so as not to abuse the pitch trim and trim servo clutches. The Pitch Trim Check involves making sure the pitch trim handle and the yoke moves, and moves in the correct direction. Note that the Altitude Pre-select features cannot be effectively tested on the ground.
- Ensure only A/P Button #1 engaged
- Position Controls to level flight
- Button #8 – Push ON Pitch Mode
- Rotate Control #8 to fully up and allow the yoke to move to the stops
- Verify pitch trim wheel moves in the appropriate direction
- Verify Yoke moves in the appropriate direction
- Overpower by pushing down
- Rotate Control #8 to fully down and allow the yoke to move to the stops.
- Verify pitch trim wheel moves in the appropriate direction
- Verify Yoke moves in the appropriate direction
- Overpower by pushing down
- Move Heading bug left and right on Aspen
- Observe yoke movement
- Center heading bug to stop movement
Electric Pitch Trim Check: That’s easy. There isn’t one installed on my airplane. Setting Control #7 altitude with the autopilot engaged runs the electric pitch trim, and manually turning the overhead crank works otherwise.
Flight Plan: We will only do the autopilot tests after the preliminary checks are completed. Once we ensure the airplane flies true and there are no obvious engine, fuel, or systems issues, we’ll begin the autopilot test.
VFR only, climb and maintain 3000′ direct KILG from KGED. We’ll establish VFR flight following with Dover and not plan on landing at KILG. I’ll turn it around at the northern extent of Dover’s airspace and fly back to KGED. Land and check the airplane out for any issues.
Wing Leveler Mode: This is a wing leveler mode where Control #3 will bank the aircraft left and right. Resistance should be present in the yoke roll movement, but no resistance in pitch. The autopilot is flying the airplane on course, but altitude is held manually with elevator and trim.
- Ensure all A/P buttons are OFF.
- Button #1 ON – A/P Roll Switch – also the Master Switch
Wing Leveler Mode w/Lateral Guidance: The airplane will follow the heading bug on the Aspen, and will also follow the Garmin 530 WAAS for lateral guidance. Selecting GPSS on the Aspen changes the heading mode into GPSS tracking. Remember that Altitude is not being held.
- Ensure only A/P Button #1 engaged
- Center Aspen Heading Bug
- NAV/Approach Coupler to HDG
- Button #2 Heading Mode Push ON
- Move Heading bug left and right on Aspen
- Select GPSS mode on Aspen to test lateral control
Altitude Hold: Roll mode is engaged and we are tracking our GPS course in the horizontal plane. Buttons #1 and #2 are engaged, and the Aspen GPSS steering mode is active (NAV Coupler is in HDG mode).
- Ensure A/P buttons #1 and #2 are engaged (ON).
- NAV/Approach Coupler to HDG
- Aspen Mode to GPSS – The aircraft should intercept and hold the GPS derived lateral course.
- With zero climb or descent, use Control #7 to set Indicator #6 to indicate level flight attitude. The autopilot will hold that altitude based on the barometric pressure it senses.
- Set Indicator #9 to indicate the current altitude as a reference.
- Control #7 can be used gently to tweak altitude as pressure changes, etc. Don’t let the kids touch this or you’ll be pulling yourself off the ceiling.
Altitude Hold with changing airspeed: Once you are flying along and altitude is being held:
- Accelerate by adding power. Verify that the pitch trim motor moves freely and works to hold your altitude.
- Decelerate by reducing power. Verify free movement in the opposite direction.
Flying along through up and down drafts, Indicator #6 reflects a need to climb or descend and the altitude fluctuates. The autopilot responds with an appropriate pitch command that moves Indicator #6 back toward zero. Note that Indicator #9 has no effect in this mode, but will be used a reference in pre-selecting a new altitude.
Altitude Pre-select: Say we are flying along at 3000′ and have successfully captured that altitude. Cleared to 4500′, we want to use the autopilot to climb for us.
- Ensure A/P Buttons #1, 2, and 4 are engaged
- Ensure Indicator #6 is showing level and #9 shows current altitude – Indicator #9 matters at this point. The autopilot knows the current pressure and will use this to estimate when it reaches the new set altitude.
- Button #4 – Push ON Altitude Pre-Select
- Calibrate Indicator #9 to current altitude
- Rotate Control #7 to the new altitude. Observe Indicator #6 is not longer level and indicates and appropriate climb or descend signal. The airplane will not climb until pitch mode Button #8 is engaged.
- Return Control #7 to level indication
- Set Control #5, the Pitch Command Disk, to a low rate near zero
I may need to disengage Button #4, but I’m not sure - Button #8 – Push ON – engaging pitch mode.
- Rotate Control #7 to the new altitude and the aircraft climbs or descends
- Use Control #7 to fine tune the level off, then disengage pitch mode to capture altitude.
I’ll test this in flight only if all goes well with other things. Shaking off the rust.
Fly Safe!
Frank